Disclaimer

Disclaimer: We do not encourage the cultivation of illegal or invasive plants. All images are the Property Of Australian Ethnobotany and Sustainable Gardening
Showing posts with label Propagation. Show all posts

Friday, 8 April 2011

Catha Edulis Propagation from Cuttings and Layering

Introduction

With many mixed reports into the feasibility of cloning Catha Edulis we decided to give it a go ourselves and so far have been pleasantly surprised. We have taken 4 cuttings each of which has survived easily to the 10 day mark with 1 cutting starting to throw new growth already ! The method used was also one of the most primitive cloning methods out there. We will run through the entire process used to take 4 cuttings for you below, obviously this can be scaled according to the amount of cuttings you are taking.

Materials


2 x 2L Coke Bottles (i used 1.125 so they would fit my pots but larger is better)
4 x 150mm+ Pots
1 x cup of water
Soil - We used an 80/20 mix of recycled soil/cacti and succulent mix
clonex/cloning powder - we used clonex purple as it was what we had
Scissors
Razor-blade (recommended for taking cuttings but sharp scissors will do)

Our choice of soil was purely due to lack of other materials. However in saying that Catha Edulis loves rocky or regular soil anyway.

Step 1 - Prepare your materials

Cut your coke bottles in half. i prefer to give the lid side a bit more height as it wont have the width at the top like the base. Try to keep the cuts so they are straight otherwise it wont rest properly in the soil.

Make up your soil mix, or just use regular potting soil and fill the pots to a 20mm below the top of the pots. After this compress the soil softly and use a stick or something similar to poke a hole in the centre around the same size you anticipate your cuttings to be, a bit larger is better as when you water it and compress later the stem will be secured.


Step 2 - Taking your Cuttings

Catha Edulis Red Cutting
Semi-Rooted (day 5)

For this step we recommend using a sterilized razor blade as it won't crush its way through the stem but rather slice through without damaging the cells around the wound too much. However there has been no REAL noticeable difference in the effectiveness of cutting method used, these cuttings were taken with scissors.

You will want to select a semi-mature branch and cut roughly 6-8 leaf nodes from the tip. Try experimenting with variations relating to their maturity. We have found that despite everyones warnings about how hard Khat is to clone that it is infact relatively easy for the common household gardener.

Make your cut by bending the branch slightly and cutting through at a 45 degree angle for optimal root development space, straight cuts are not recommended for any plants. After this try to get them straight into the cup of water as it will keep them far more sterile. After you have your four cuttings remove the lower half of the leaves and trim the larger ones at the top in half.


Step 3 - Planting your Cuttings

Home Made Catha Edulis
 Propagation Chambers
Now you will want to gather all your pots, coke bottles, the clonex and cuttings in the one location. Check that the holes you made are far deeper than you intend to plant the cutting (all the way to the base of the pot would be good for the centre hole) as well as wider than the cuttings.

Remove a cutting from the water and dip it in the clonex trying to get a really thick coating on it, quickly move it over the pot ad allow the excess clonex to drip off into the hole you made. Re-dip the clone into the clonex planting it in the soil this time. Gently compress the soil around the clone and give it a very soft water to help the soil settle around the cutting, you want to drench the pot but do it slowly so you dont wash the clonex away too much. Finally site the coke bottle over the top and press it down while twisting slightly until it is roughly 20mm into the soil. Repeat for each cutting.


Step 4 - Keeping them alive until they root
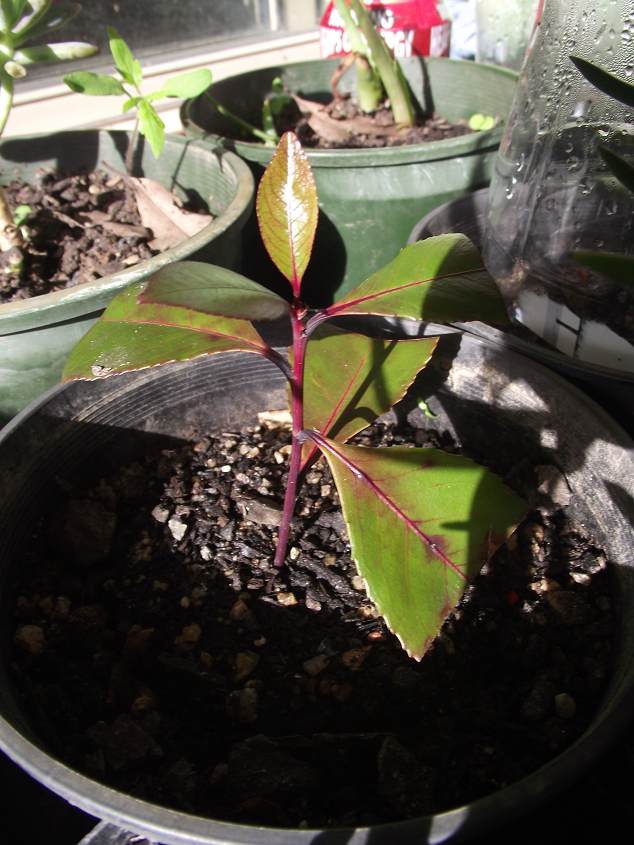
Catha Edulis Red Cutting
 Day 10
All we have done for our cuttings is apply a small amount of water when the condensation on the coke bottle starts to get a bit thinner. We also try to take the bottles off for 5 minutes every couple of days as the air in the coke bottle would have pretty much purely cleansed oxygen. We feel that photosynthesis must be promoted to encourage the plant to survive and generate roots.


Step 5 - Around 1 Month from Propagation


a further eleven days down the track and all 4 cuttings are still surviving. Two far stronger than the rest however they all appear to have struck and i am tempted to risk losing one for the sake of checking if this is true. Wish i had used clear cups for propagation so i could see for sure as the roots would be showing through right now otherwise i will have to wait and see. But the new growth is pretty substantial so i would say they are pretty safe now as for the first bit they just sat dormant whilst developing roots much like any other clone i have taken in the past.


We have now also tried layering some of our branches and had much success with this as well. I dug a small "trench"around 5cm deep placed a branch in covered it over and sat a rock on top. Had roots enough to hold itself down within a week. At this point i will now cut them off from the main plant and carefully pull the cuttings out. I will add pictures over the next few days of this process as well.


Monday, 28 March 2011

Psychotria Propagation - Leaf Cuttings

Introduction


All Psychotria ssp will take via leaf cuttings. I will list the method i have found most successful for you below. For this run i have elected to use P. carthaginensis and P. Alba as it is what i have an abundance of, however the same methods can be applied to Psychotria Viridis and "Nexus".


What you will need.


1 x roll of kitchen paper towel
 2 x full sandwich clip lock bags
 1 x Permanent Marker or pen
 20 x elastic bands (or hair ties or anything to secure the paper towel around leaves)
 Water


Step 1 - Prepare your materials


tear paper towel off two sheets at a time ready for leaf cuttings, no need to wet them yet, and stack them to the side. Check you have all the above-listed materials


Step 2 - Preparing your leaves


Freshly Picked Psychotria Alba Leaf


I generally snip my leaves with sterile scissors right at the base near the branch of the plant, people reccomend fresh growth but i find both fresh and old growth work equally as well and older growth can be cut in half to get two cuttings from each leaf, as they are larger !


I also like to cut the base of the leaf off as i find having the main vein exposed works best but it is reported that this is not necessary.
P. Alba snipped up ready for propagation
(this step is NOT compulsary)
Step 3 - Wrapping and Bagging


Psychotria Leaf Cutting Folded and Ready to go !
Fold paper towel into thirds and then place the leaf a fraction away from an edge and about half of the leaf in the towel. Fold the corner closest to your cutting over then fold the paper toweling up around the leaf and secure with elastic band. Soak this under the tap until it is soaking wet then place directly into zip lock bag.


Psychotria Alba Leaf Cutting - Ready to be folded
Step 4 - Final Prep Stages


Ready to Go P. Cartha
Propagation bag.
After placing all your cuttings into the ziplock bag close it up then slide one of the corners open just enough for you to be able to breathe into the bag. Take a deep breath and hold it for as long as you can depleting as much of the oxygen as possible. Breathe into the clip lock bag until it is FULL of air and quickly clip the bag shut.


Place the cuttings somewhere out of direct sunlight but still reasonably well lit. I sat mine in the back corner of my verandah. You will have to re-open the bags periodically to blow some "fresh" CO2 in to help the plants along their way, i found every 3-7 days was fine depending on how many leaf cuttings are in it.


Step 5 - Potting out


Around four weeks down the track your Psychotria Leaf Cuttings should be starting to show substantial root systems, get them out and gently open the packaging. Roots will be developing directly out of the main vein in the stem and branching off from there pretty densely. I pot my cuttings out into a well draining soil mix and keep them in a larger humidity crib in 50-75mm pots for a few weeks and wait for suckers to start being thrown. If you have access to any form of rhizome development nutrients i would recommend using them at a low dose to encourage root development during this time, seasol or fish / worm emulsion would do the trick though. And i would be curious to experiment with using it in the earlier stages.
Less Developed P. Cartha
P. Cartha after 4 Weeks


A Month or so Down the Track - Pups Are Emerging !
psychotria carthaginensis With well
developed new tips


Uprooted psychotria alba
With 8 individual stems
Uprooted psychotria carthaginensis
"cross section"

psychotria carthaginensis,
Starting to throw new growth
Psychotria carthaginensis throwing
Stems from leaf cutting


Coming soon
 - Images to help explain things easier
 - - Some of the earlier steps really need them
 - Better Formatting
 - Better Wording to make it easier to understand


If you want any further assistance with propagation via leaf cuttings feel free to contact me at luke@youthgc.com or if you would rather purchase one that is already rooted and ready to go head on over to 

Australian Ethnobotany and Sustainable Gardening Centre - Webstore 

Monday, 21 February 2011

Salvia Officinalis Germination and Growth


Introduction

Commonly referred to as Sage, Garden Sage or Kitchen Sage. Salvia Officinalis is used widely around the world as a cooking herb but is also believed to have some effect in countering Alzheimer's. We have accidentally planted our stock in the wrong season and are noting extremely slow but consistent growth. Even from the first set of real leaves the scent is extremely strong and could easily be used as a wonderful perfume.

Roughly 1 Month from Germination

On day 11 we have seen a 85% Germination rate. They are planted in a regular free draining potting mix, that was mixed with some mulch, in communal pots and were potted out after 26 days into individual pots to allow stronger growth. The plants have a wonderful scent already and when repotting it could be smelt all around the yard and even throughout the house.

Salvia Officinalis Seedlings
In communal Pots at 3 weeks
From Germination
Salvia Officinalis Seedling at
around 1 month from Germination

Sunday, 9 January 2011

Citrullus lanatus var "caffer" propagation from seed

Introduction

After having recently recieved some Citrullus Lanatus (watermelon) seeds through a trade we decided to give it a go getting some growing. We have had pretty good germination rates so far. This post will be updated at various intervals in the life of the plants to offer info on a variety of aspects of growth from seedling through to fruiting.

Day 9 (04/04/2011)  -  4/8 Seedlings have emerged

On day nine we have seen the emergence of 4 healthy seedlings. They are planted in a regular free draining potting mix in communal pots and will be potted out into individual pots in a week or two. We would expect more of the seedlings to have come up by then as well. We had them in a shaded area and noted that they were stretching for the sun so have since been moved to a slightly sunnier area.
Citrullus Lanatus "caffer" Seedling
Close up
Citrullus seedlings stretching
For the sun


Day 33 (28/04/2011) - Starting to get their real Leaves


Growth has slowed pretty dramatically as we have recently entered into the colder months which are clearly not ideal for these plants. However the plants are still continuing to throw steady new growth and will be potted out mid next month to allow them to truly flourish and develop a sturdy root system.

Citrillus Lanatus "Caffer" #1
Citrillus Lanatus "Caffer" #2